Creating a Dynamic WPF Menu : Part 3

Please note: This page has now been moved. Click here to go to the new site.

File MenuIn the first part of this series, I introduced the menu service and the menu item base class. In the second part I introduced the command implementation and the hierarchical data template. In this third and final part, I will bring it all together.

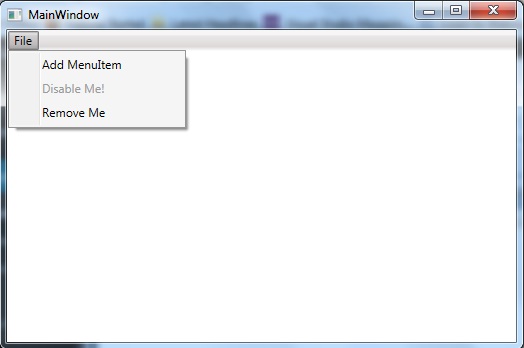
I have created 4 different menu items, a top-level File menu, a menu item responsible for adding a third, which can then remove itself. A fourth item will disable itself when clicked.

Top level file menu:

 class FileMenuItem : MenuItem
    {
        public FileMenuItem() : base("File", "_File")
        {

        }

        public override void OnItemSelected()
        {
            // Top level item, we don't need to do anything.
        }
    }

A menu item which can add a third:

class AddMenuItem : MenuItem
    {
        MenuService menuService;

        public AddMenuItem(MenuService menuService) : base ("AddMenu", "Add MenuItem")
        {
            this.menuService = menuService;
        }

        public override void OnItemSelected()
        {
            RemoveMenuItem removeItem = new RemoveMenuItem(this.menuService);
            menuService.AddMenuItem(removeItem, "File");
        }
    }

A menu item which can remove itself:


class RemoveMenuItem : MenuItem
    {
        private MenuService menuService;

        public RemoveMenuItem(MenuService menuService) : base ("Remove", "Remove Me")
        {
            this.menuService = menuService;
        }

        public override void OnItemSelected()
        {
            menuService.RemoveMenuItem(this);
        }
    }

A menu item which can disable itself:

class DisableMenuItem : MenuItem
    {
        private bool enabled = true;

        public DisableMenuItem() : base("DisableMenuItem", "Disable Me!")
        {

        }

        public override void OnItemSelected()
        {
            this.enabled = false;
        }

        public override bool ItemCanBeSelected()
        {
            return this.enabled;            
        }
    }

The view model that initiates the service and starts building the menu’s:

 class MainWindowViewModel : INotifyPropertyChanged
    {
        MenuService menuService;

        public MainWindowViewModel()
        {
            this.menuService = new MenuService();

            FileMenuItem fileMenu = new FileMenuItem();
            AddMenuItem addMenu = new AddMenuItem(this.menuService);
            DisableMenuItem disableableMenuItem = new DisableMenuItem();

            menuService.AddMenuItem(fileMenu);
            menuService.AddMenuItem(addMenu, "File");            
            menuService.AddMenuItem(disableableMenuItem, ("File"));            
        }

        public List<MenuItem> ParentItems
        {
            get
            {
                return this.menuService.GetParentMenuItems();
            }
        }
    
        public event PropertyChangedEventHandler  PropertyChanged;
    }

And setting the data context in the view code behind:

public partial class MainWindow : Window
    {
        public MainWindow()
        {
            InitializeComponent();

            this.DataContext = new MainWindowViewModel();
        }
    }

As you can see, most of the hard work is done in the menu item base class, and the file menu service. After that, adding, removing and disabling menu items is very simple, and can be carried out at run time.

This could be extended to allow separators using a style converter, and an IsSeparator boolean, and additionally it would be easy to include a sort order property which the service can apply/use to order the items, but I have left them out to keep the code clean and straightforward.

Creating a Dynamic WPF Menu : Part 2

Please note: This page has now been moved. Click here to go to the new site.

File MenuIn part 1 I introduced the idea of a dynamic menu build using WPF and the hierarchical data template. In this, part 2 I will carry on putting the foundations in place for the menu, and in part 3 I will link everything together.

Firstly I shall cover the implementation of the ICommand for the purposes of this menu. You will see in the base MenuItem class in part 1 we exposed an ICommand property. The ICommand allows us to specify a command to run when we click our menu item, and also to specify whether or not we can click the command. WPF uses the second to determine whether or not the menu item should be enabled.

class MenuCommand : ICommand
    {
        private Action execute;

        private Func<bool> canExecute;

        public MenuCommand(Action execute, Func<bool> canExecute)
        {
            this.execute = execute;
            this.canExecute = canExecute;
        }

        public void Execute(object parameter)
        {
            execute();
        }

        public bool CanExecute(object parameter)
        {
            return this.canExecute();
        }

        private void RaiseCanExecuteChanged()
        {
            CommandManager.InvalidateRequerySuggested();
        }

        public event EventHandler CanExecuteChanged
        {
            add
            {
                CommandManager.RequerySuggested += value;
            }
            remove
            {
                CommandManager.RequerySuggested -= value;
            }
        }
    }

When we initialise the ICommand, you can see we pass the Action to execute and a function that returns a boolean ( Function ). If you look at our MenuItem class in part 1, you can see there’s a virtual method that by default returns true. If we do require to disable a menu item, then we can override this, but the majority of the time this will not be needed.

The CanExecuteChanged event is hooked up to the command manager requery suggested event, which fires sufficiently often from our user interface that it will make the disabling look like it occurs in realtime.

Now the hierarchical data template. To use this we do two things. We bind the menu bar to the top-level [parent] items, then we bind the data template to the menu item subitems list. The hierarchical data template will then iterate through all menu items and get the sub items until a complete tree has been built. In each case, we also bind the text property of the menu item object to display to the user. The RecognizesAccessKey property allows us to specify a shortcut key with the _ character.

We also need to create a style to bind OnSelected command of each MenuItem, and apply that style to each.

<Window x:Class="DynamicMenuExample.MainWindow"
        xmlns="http://schemas.microsoft.com/winfx/2006/xaml/presentation"
        xmlns:x="http://schemas.microsoft.com/winfx/2006/xaml"
        Title="MainWindow" Height="350" Width="525" SizeToContent="Manual">
    <Window.Resources>
       <Style x:Key="MenuItemStyle" TargetType="{x:Type MenuItem}">
        <Setter Property="Command" Value="{Binding OnSelected}" />
    </Style> 
    </Window.Resources>    
    <Grid>
        <DockPanel LastChildFill="True" >
        <StackPanel Orientation="Horizontal" DockPanel.Dock="Top">
                <Menu IsMainMenu="True" ItemsSource="{Binding ParentItems}" Width="525"> 
                    <Menu.ItemTemplate>
                    <HierarchicalDataTemplate ItemContainerStyle="{StaticResource MenuItemStyle}">
                        <ContentPresenter Content="{Binding Text}" RecognizesAccessKey="True" />
                        <HierarchicalDataTemplate.ItemsSource>
                            <Binding Path="SubItems" />
                        </HierarchicalDataTemplate.ItemsSource>
                    </HierarchicalDataTemplate>
                </Menu.ItemTemplate>
            </Menu>
        </StackPanel>
        <Grid />
        </DockPanel>
    </Grid>
</Window>

In part 3, I will put this all together.